
PRINT GUIDELINES

OFFSET PRINTING
Offset printing, also called lithography, is a high quality way to produce larger quantities. It uses a large printing press with a series of printing plates that transfer cyan, magenta, yellow, and black (CMYK) ink onto large sheets of paper called “parent sheets”. These parent sheets are then cut, folded, and bound to form a final printed product. Because of the complex machinery involved, offset printing does require a higher setup cost than digital printing. Digital printing offers flexibility and convenience because they eliminate setup costs all together. However, the saturated colors, real ink, and authentic feel of offset printing offers a far superior final product.

BINDING
Saddle-Stitching is the simplest binding method, in which pages are folded and stapled together. This type of binding is used for booklets, workbooks, catalogs, and many magazines with smaller page counts.
Perfect Binding is the binding method used for paperbacks and softcover books. Pages are folded, gathered, and then glued into a cover to form a squared-off spine.
Wire-O Binding lays completely flat and is often used for cookbooks and manuals. In wire binding, pages are trimmed and assembled, holes are punched along one side, and wire is clamped down through those holes.

PAPER WEIGHT
Paper weight refers to the thickness of the paper stock used. Our paper offerings are divided into two weight categories:
Text stock: Measured in pounds (usually noted lb. or #), these papers are most often used for inside pages of books, flyers, letterhead, and business forms.
Cover stock: Measured in both pounds and points (usually noted lb. or pt.), these papers are most often used for cover pages of books, business cards, postcards, and posters.
However, there are many different paper weight classifications beyond text and cover. The most common unit of measurement is gsm (grams per square meter). Below are the most common paper weights used at Walker Printing in both coated and uncoated stocks.

PAGE COUNTS
Page counts for all of Walker Printing projects are calculated the same way you would count pages in a novel - each side of a sheet counts as a page. Even if a page is blank, it still needs to be added into your total page count.
Multiples of Four: Page counts must be divisible by four. This is because in the saddle stitching process, pages are printed on large parent sheets, trimmed, and folded down to create a finished product. Each set of four pages is actually made up of one folded piece of paper.
Exceptions: The only exception to the divisible by four rule are wire-o bound projects. This type of binding doesn’t doesn’t involve folded sheets. This page count would be in multiples of two.
PRINT FILE SETUP

BLEED
All projects with printing that goes to the edge of the page, requires an extra 1/8” of artwork or “BLEED” beyond the trim line in all dimensions. Bleed allows for the tiny variances that are inherent in mechanical printing and allows your design to run all the way up to the edge of each page.
Safe area: Anything inside this line is safe, so you’ll want to keep important content within this box.
Trim line: This is the edge of your page, and where we will trim your project to size. You’ll need to extend your artwork 0.125” past this line.
Bleed line: Your artwork should extend up to this line. Any content between this line and the trim line will serve as a buffer during the cutting process.

PRINTER’S MARKS
Printers use special marks to indicate different elements of each printed page. We ask that you ONLY APPLY THE CROP MARKS to your files. We will take care of the rest of the marks during the pre-press process. For your reference, here’s how to read the different print marks.
Color Bars: These bars are used by the pressman to measure ink density during the printing process.
Registration Marks: These mark the horizontal and vertical centers of each page to ensure proper printing and trimming.
Crop Marks: These show where the page will be trimmed.
Bleed Marks: These show where your bleed ends.
SPREADS
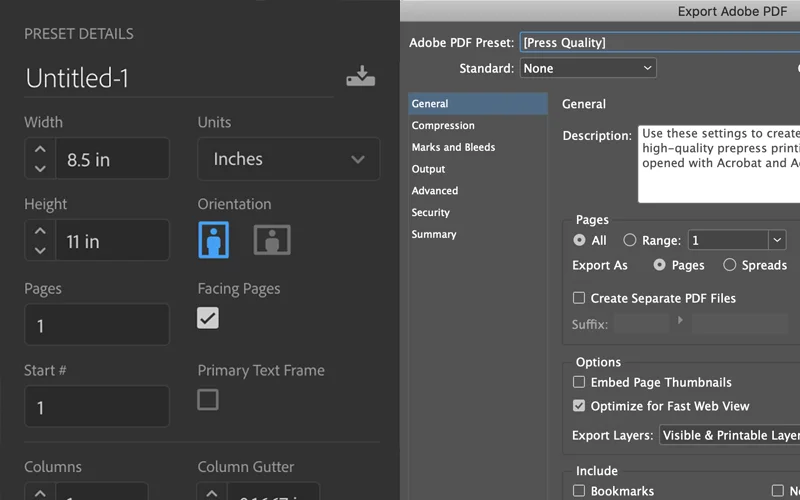
This does not mean a spread of hummus on some tasty sourdough bread...a spread is a layout that extends over the gutter, across two pages. Many designers like to utilize crossovers, which is an image spread across two pages. In order to set up a crossover, you will need to setup your working file with “facing pages”. The image on the right shows the appropriate checkbox needed to setup properly in our preferred design software, InDesign.
When exporting your file for final print, we recommend using the “Press Quality” PDF Preset found under File > Adobe PDF Presets > Press Quality. We prefer to receive single page PDFs even when crossovers are being utilized. So make sure the “Pages” button is selected instead of “Spreads”.
COLOR SPACES
The RGB color profile combines red, green, and blue light to create colors. It is used mostly by computer monitors, televisions, phones, LCDs, and any device that emits light to create color. Since RGB depends on light and not ink, it is physically impossible to print RGB files without first converting them to CMYK, which is based on blending inks.
It is important to note that there is no direction conversion between these two color models, and certain colors that are possible in RGB cannot be replicated in print. For this reason, we recommend converting the colors on your end first before submitting your art files.
We can convert your colors to CMYK for you, but it will inevitably cause shifts in the color palette. Hence the reason for proofs, right?

TYPES OF BLACK
When creating your layouts, keep in mind that there are two types of black: standard and rich black. Standard black uses only black ink (100% K), whereas rich black contains elements of other colors (cyan, magenta, and yellow). Because rich black uses more ink, the resulting color will be deeper and more saturated.
The two might look the same on your screen, but they won’t be the same on paper. In print, the difference will be somthing like when you see to the right. For consistency’s sake, be sure to check the saturation value for each color in all shades of black.
NOTE: We recommend that you avoid using rich black for text to avoid issues with misalignment (or what we also call, registration issues).

RESOLUTION
Resolution is measured in ppi (pixels per inch) for digital images, or dpi (dots per inch) for printed images.
For printing, the recommended resolution for all images and art files is 300 dpi. The human eye can’t distinguish much beyond this resolution, and the offset press can’t accurately reproduce details much beyond this resolution, so it is the industry standard.
Sometimes, the only images or art files available are under 300 dpi. If your images are in the 200+ dpi range, they will still look pretty good, although not quite as sharp as images at a full 300dpi.
Images with less than 200 dpi are considered low resolution (lo-res for short). They will exhibit notable pixelation / blurring in the final printed product.
PROOFS
We offer three different proofing options for your project:
Electronic proofs are free of charge and our preferred method. The proofing turnaround is faster and allows us to achieve the quicker print turnarounds that we’re known for.
Digital hard copy proofs may incur an additional fee. These proofs are printed with our digital press typically on the paper specified to your project. This process takes a little bit longer, so your project turnaround time could be delayed up to 2 business days.
Offset hard copy proofs are not common and the cost is quite substantial. This process takes longer, so your project turnaround time could be delayed up to 3-5 business days.

ETA
The total turnaround time is dependent on prepress, production, and shipping/delivery schedules. However, standard turnaround times are as follows:
Proof Turnaround: 24-48 hrs
Print Production: 3-5 business days (for large quantities, specialty projects, or projects requiring extra attention, add an additional 2-5 business days)
Direct Mail Servicing: 2-4 business days
Shipping/Delivery: 1-2 business days if being delivered; 2-6 business days if being shipped (depending on your location)
These turnaround times are estimated and could change at any time. Talk to us for a more accurate ETA on your project.

FILE CHECKLIST
Do you have 0.125” bleed included?
Do you have crop marks only?
Have you checked for rich vs. standard black?
For Adobe users, did you avoid using “Registration Black”?
Is your type set for black only?
Did you export your file in the CMYK color space?
Are your images high-resolution?
For booklets, did you export the PDF as single pages?
Did you discuss turnaround times with us?
FREQUENTLY ASKED QUESTIONS
What is your turnaround time?
The total turnaround time is dependent on the prepress, production, and shipping/delivery schedules. However, our standard print production turnaround is 3-5 business days on normal sized projects. Larger runs or specialty projects could take some extra time. Talk to your customer service representative about your project for a more accurate timeline!
What file formats do you accept?
We work in the Adobe Cloud programs, so we can accept Illustrator (.ai), InDesign (.indd), and Photoshop (.ps) file formats. However, if you don’t have those programs, we accept PDF files! PDF’s are the main file type we print from.
Can you make changes to provided files?
Yes and No. And it all depends on the file format provided and if the file is “unlocked” for us to make changes. Talk to your customer service representative for more details.
Do you deliver?
YES! We deliver to the following California cities FREE OF CHARGE:
Redding
Palo Cedro
Anderson
Cottonwood
Red Bluff
Gerber
Los Molinos
Corning
Chico*
*Delivery would depend on size of order. Otherwise the order is shipped.
Do you check for color accuracy?
Absolutely! Our staff checks the color for each and every print job. If the job is a reorder, the print is matched to a previous sample. If the order is new, we check to a color calibrated monitor.
*NOTE: Digital and Offset color varies! When printing full color, there is always a chance of a slight color variance. If you need a very specific color, we recommend printing in Pantone Spot Colors on the offset press!
How large can you print?
Offset Press, up to 18” x 24” with full bleeds
Digital Press, up to 12” x 18” with full bleeds
Large Format, up to 4’ x 150’ with full bleed
Any other questions?
Have more questions? Please give us a call at (530) 527-2142 or shoot us an email at info@walkerlitho.com. We’re happy to answer any of your questions!